In doing this Tutorial, you are agreeing to my copyrights.
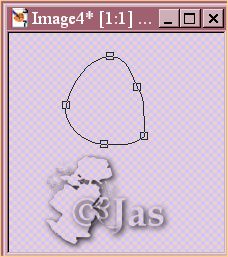
1: Choose #FED090 as Background colour, foreground to Null. Select the Eclipse preset shapes.. line width 1 antailias checked, and create as vector checked. Draw a circle about 110 x 110 in size. shape as follows.
Although I rarely save myself while working, I will often remind you throughout this tutorial
So, SAVE
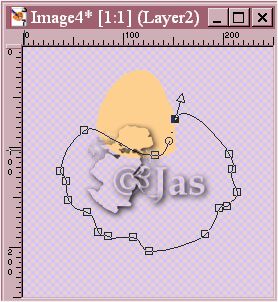
2. Change background colour to white. Again choose the preset shapes, eclipes. this time draw a circle of about 175 x 150 in size. shape as follows. We want to make it look like a Beard, beards are not fully round, make it look like whisps of hair on the bottom by making some points here and there.
Deselect.
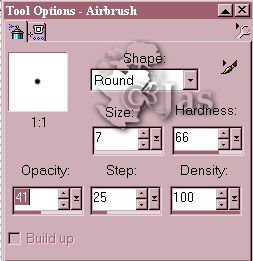
3. Highlight the background layer, then create a new Raster layer, foreground colour of white. Select the Airbrush or the paintbrush.. whichever works best for you. Size: ( 7 on right side of head, 3 on left side of head) and settings as in the picture. Now paint on some hair on each side of the head. I know this don't look like much right now, but we will fix it later :)
SAVE
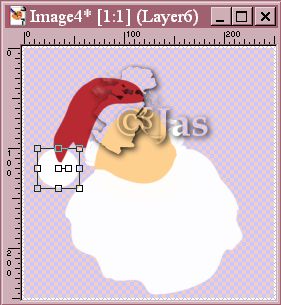
4. Hat back: Make your background colour of #B82A31, then select the preset shapes of eclipe, draw and eclipe of about 110 x 100. Zoom in so you can see what you are doing, and add nodes where needed, to get the shape of this.
Deselect.
5. Hat pom-pom: Make your background colour #FFFFFF / white. Again select the preset shapes eclipes and draw a circle of about 50 x 50. Place this layer Under the hat back layer.
See picture.
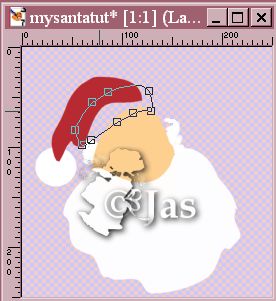
Notice also I fixed the beard... it would of been ok when we put the mouth on, but it was bothering me.. LOL. You can do this by just adding another eclipse over the beard, and shaping it around the head.
SAVE
6. Hat fur: Make your background colour of #9999A5. Select the preset shapes, this time choose the Rounded Rectangle... make it about 25 high, and about long enough to where it will fit your hat back, but we want some of the left back of the hat to show, so don't fit it intirely.
Deselect.
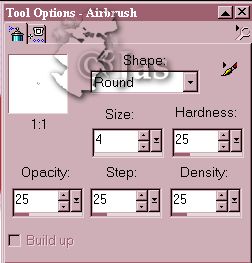
7. Ok now, go to the head layer and Convert to raster layer, while selected.. add a new raster layer above that one. We are going to put on some lines of character. with colour of #BE7258, use the air brush, or paint brush, in size of 4.. with this setting:
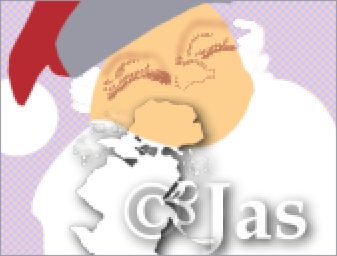
Draw some lines for eyebrows, around cheeks, and down nose.... Like so.

Now with that layer still selected, go to Effects, Blur, Gaussian Blur, setting of 1.00
SAVE
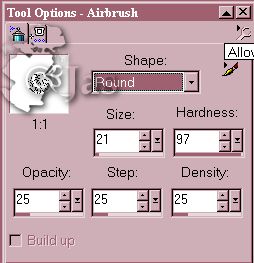
8. Add a new Raster layer. Select the Airbrush again, all settings stay the same except make the size to: 2, Zoom in so you can see. Make some eye creases, and some nose creases..... remember Santa is fat.. so we want him to appear that way... LOL.. Make the size to 1 when needed for finner lines, around the nose area. Now make the size around 3 for creases around the check area.
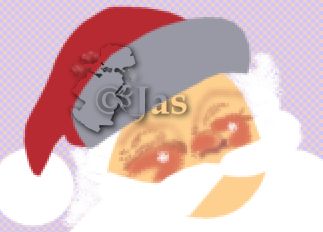
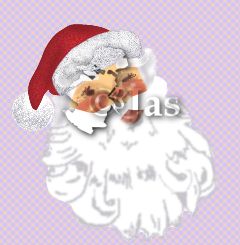
This is what I have so far, zoomed in by 1... so it can fit on the web page... LOL. It was really zoomed in about 5 more more to see.
Go to Effects, Blur, Gaussian Blur.. setting of .50 for now.
9. Cheeks: Add a new Raster Layer. Airbrush set at size: (9 for the left side, 6 for the right) make the Hardness of about 40. And do the nose also :).. This is because we want to make it appear like Santa is turned a bit to the side, so we go wider on one side then the other. Add a layer over that, change colour to #FFFFFF / white. use the paint brush. We are layering each step on the face area here so that when we blur it, we blur only one layer at a time.
Oops, never mind the mustache in this picture... LOL.
Blur, Grassian Blur.. same settings as last time.
SAVE
10. Again make a new Raster layer. with paintbrush same as before, but size of around 5, and colour of #000000 / Black. Make kind of a half an eye on the left side, and just a little slit of an eye on the right side, of size of about, 2.. make some eyelashes while you are at it at size of 1. soften this a bit with the retouch tool... I just have mine set at: Round, Size 25, Hardness 0, opacity 42, Step 25, Density 100... just dab here and there over the eyes, we don't want to spred it, just dab it here.
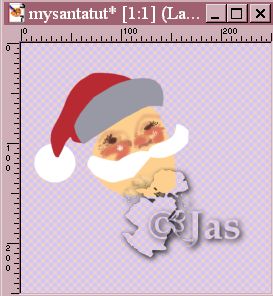
And my results so far.

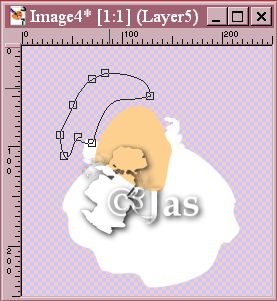
11. Mustache: Turn off your Beard and hair layers so you can see what you are doing and, make the mustache with colour #FFFFFF / White. Preset Shape ...same as last time, settings should still be there. Make this just below the nose, like so.
SAVE.
Ok We are getting there!
12. Mouth: Click on the Beard Layer, then choose your preset shapes, in the colour of: #AE6252 for your background. Shape Eclipse. Make the circle then bring the top down to form the shape of a lip. Make sure this layer is below your mushtache layer.
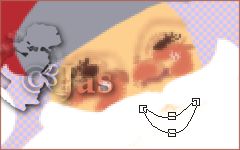
13. Now underneath that layer, with colour of #854A44, make another Eclipse, to fill in the hole of his mouth.
Deselect.
On that same layer, Convert to Raster Layer... make your colour #C48179, Add a new Raster layer, and with the paintbrush same settings as before.. make a highlight just a tad on the left side. Get the Retouch tool, same settings.. and just dab, dab, dab.. about 3 times over that highlight. Remember, we are dabbing, not spreading.
Now go back go the Lip Layer, Convert to Raster Layer, and do the same, only with colour of #FFA38C, do this along the left side of the lip.. a little longer going about half way along the lip.
Get the retouch tool again , dab, dab, dab, smudge, smudge, smudge.. just like that .... LOL, I know no other way to explain it! :)
Now with colour #FFC1AC, and paintbrush size of 2, add a dot on the right side, then slide a tad, then on the left side of the lip, one dab. Again, retouch, dab, dab, dab. LOL, :)
SAVE.
14. Ok, so far so good! :) Now go to your 'Hat back' Layer, and Convert to Raster Layer. Go to seletions, Select All, Float. Then go to, Effects, Noise, Add, at 15%, ok. Now deselct. Selections, Select None. Add a new Raster Layer, with colour of #7E1F27, Grab the paintbrush.. size of about 7.. add some creases in Santas Hat. Go to Effects, Blur, Gaussian Blur, settings of 4.00. Now go to the Hat Back Layer again. Go to Selections, Select All, Float, Invert... then go back up the the layer with the creases you just made on the hat and hit delete on the keyboard to get any excess that went over the sides of the hat. Selections, Select None.
14. Hat Front / Fur, Highlights: Now go to your hat front / Fur Layer, Convert to Raster Layer. Add a new Raster Layer. With Colour of #FFFFFF / White, choose your Airbrush tool. Size 21... settings the same I think! LOL... here's the picture.
Dab, Dab, Dab again! .... LOL, here and there, don't worry about going over the sides.. we can fix that... heck we can fix anything! LOL. Go underneath this layer to the gray one, go to Selections, Select All, Float, Invert, then go to the highlight layer, Hit Delete on your Keyboard, Selections, Select None. Now do the same for the Hat Pom-Pom. Add a new Raster Layer, Colour of #9B99A6... Dab, Dab, Dab!... again, go to the pom-pom layer, Selections, Select All, Float, Invert, up to the highlight layer again.. delete on keyboard.
SAVE.
15. Hair Highlights: Go to the Hair Layer, Add a new Raster Layer. Make your colour #C7C4CA, use your paintbrush in size of 4, 3 in some areas, all other setttings the same... paint on some highlights. Go to Effects, Blur Gaussian Blur, settings of 2.00, ok. If you need to, do the delete around the outsides with the float invert again.
16. Eyebrow Hairs: Go to the Hat Front / Fur Layer, Add another Raster Layer. Colour of #FFFFFF / White. Paintbrush Same settings. Paint on some Eyebrows. Back to colour #C7C4CA, Add a new Raster Layer. Paint on some highlights on the eyebrows, brush size of 2. With the Retouch tool... dab, dab, dab, smooth a bit.
Here is the picture zoomed in at 2:1, so you can see the hair highlights, and eyebrows highlights.

17. Beard Highlights: Go to the Beard Layer, Convert to Raster Layer. Add a New Raster Layer. Colour should be the same of #C7C4CA, Again grab your paintbrush, same settings.... Put in some whisps, and curls and highlights on the beard. Go to Effects, Blur, Gaussian Blur, Settings of 1.00, ok.
18. Mustache: On the Mustache Layer, Convert to Raster Layer. Add a new Raster Layer. Colour the same gray, Again grab your paintbrush, same settings.... put on some highlights... more so on the ends then anywhere, we want this one a little whiter, and a little along the bottom edge... but then it's up to you :) after all it is your graphic... I just own the copyrights to this tutorial. Get the retouch tool.... smudge this a bit on the ends... again delete around the outside by going to the mustache layer, Selections, Float, Invert.. back up to the layer.. delete on keyboard.
19. with a few touch ups here and there, a few smudges.... we are done.
Merge all layers visible :) Save!